
Beginner progression guide
Suikoden STAR LEAP Beginner Guide | Team, Growth, and Base
A practical early route for story progress, team roles, growth materials, base restoration, and daily rewards. The method stays useful when launch information changes.

Short answer
Move through the story, build one main team, then invest in the base
The safest Suikoden STAR LEAP beginner guide route is to unlock systems through the opening story, identify the role missing from your party, and focus growth materials on one main team. Do not level every character at once. When a stage fails, separate damage, durability, healing, support, speed, and gear problems before spending another resource.
Keep materials for the next growth threshold and for base functions that improve future progress. Check missions, gifts, production, and free rewards every day. Treat gacha as a way to fill a real team gap, and use the current in-game screen and official notices whenever an old guide disagrees with what you see.
- Unlock the first systems in story order and record their conditions
- Choose one missing role: damage, durability, healing, or support
- Keep a reserve for the next upgrade and base requirement
- Collect daily tasks, production, gifts, and time-limited rewards
- Write down why a stage failed before changing the team
1. First route
Use the opening story to learn systems before chasing upgrades
The early game is easier when each new screen answers a current question. Move through the tutorial and opening chapters, then check where summons, party formation, equipment, growth, and base functions are updated. Spending ahead of an unlock can leave the current team short on materials, so wait until the requirement is visible before committing resources.
After a chapter or stage, note the reward, the next unlock, and the condition of your main team. A loss is useful information: ask whether the enemy defeated you through raw damage, missing durability, late healing, poor turn order, or weak equipment. Repeating a stage without naming the problem often spends stamina without improving the next attempt.
| Stage | Check | Ready to move on when |
|---|---|---|
| Opening | Tutorial, party, summon display | You know the first team gap |
| First growth | Level, gear, and skill entry points | You can name one focus unit |
| First loss | Damage, durability, healing, turn order | You can name one cause |
| Base unlock | Production, facilities, and task updates | You know what to collect daily |
If your screen or reward differs from an older guide, use the current in-game display and the official notice first.
2. Early team
Fill the missing role before chasing a character name
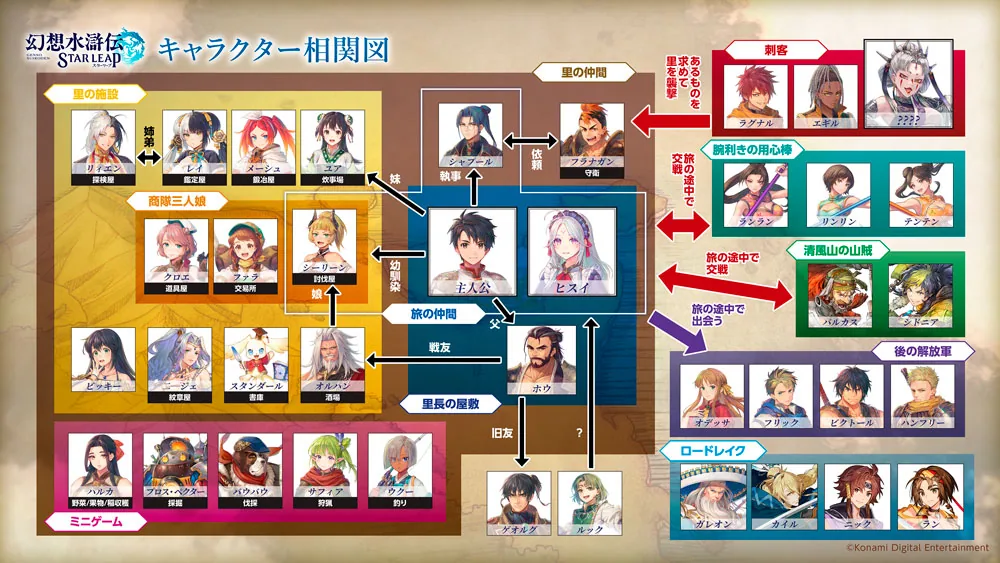
An early party works as a group. A roster full of damage dealers may fall before it can act, while a defensive group may fail to finish a stage. Start with the reason for your last loss, then choose one missing role. The character guide is useful for official profiles and relationships; it should not be treated as proof that an unverified ranking is permanent.
When two characters fill the same role, compare access, growth materials, equipment dependence, and team fit. You do not need a perfect six-character roster on the first day. Keep a small main group and one or two alternatives, then update the choice when a new system, base function, or reliable game screen adds evidence.
| Problem | Look at first | Avoid |
|---|---|---|
| The team is defeated quickly | Durability, healing, and support | Adding only another damage unit |
| The enemy is not defeated | Damage, weakness coverage, and turn order | Raising everyone a little |
| The team cannot recover | Healing and damage reduction | Relying on one lucky critical |
| Materials are scattered | One main group and a reserve slot | Adding units from an unverified tier label |
A tier label changes with content and check date. Early value means role coverage and realistic growth, not a letter alone.
3. Growth materials
Choose one next threshold before spending the next resource
A reward is not automatically ready to spend. Check whether the next story wall, facility unlock, or equipment step needs the same material. Pick the growth item that addresses the named failure, write down the next threshold, and keep the remainder for that target. Expand to a substitute unit only after the main team can cross the current progression line.
For farming decisions, compare the reward with the unlock condition, stamina cost, and other materials earned at the same time. A simple note with the unit, current value, next target, material, source, and check date stays useful when an event or balance update changes numbers. This is more reliable than copying a permanent-looking table from an unknown date.
-
1
Name the failure
Separate damage, durability, healing, turn order, gear, and support issues.
-
2
Write the next threshold
Choose one level, gear step, or skill milestone for the main team.
-
3
Confirm the source
Check story rewards, tasks, base production, and farming screens in the current version.
-
4
Test the same wall
Change one cause at a time so you can tell whether the investment worked.
Drop rates, caps, and quantities can change by version or region. Keep uncertain values tied to a check date.
4. Base and daily tasks
Treat base restoration as a long-term resource loop
When a base function unlocks, look beyond the immediate reward. Production, facilities, task refreshes, and future unlocks can support the same team that is carrying the opening story. You do not need to raise every facility at once. Prioritize the function tied to the current wall or to reliable daily income, and keep a reserve for the next story requirement.
A simple daily loop is to check tasks and gifts on login, collect base production, review free summons or exchanges, and scan the list before closing. Write down event dates and conditions, then separate spendable resources from those reserved for a base unlock or confirmed team gap.
| Daily check | When | Record |
|---|---|---|
| Tasks and gifts | At login | Conditions and expiry |
| Base production | Start and end of session | Output and next unlock |
| Free rewards and exchange | Around reset | Spend or save decision |
| Limited event | When you read the notice | End date, entry, priority reward |
5. Fewer mistakes
Five early mistakes that slow progression
Most early stalls come from spending order or mismatched information rather than from a hidden trick. An old launch reward may no longer match the live screen. A strongest-character name may require a costly build. A base resource spent on a short reward may be missing when the next facility opens. Treat date, region, and version as part of every claim.
Before deleting an account or restarting a reroll, return to the team, growth, gear, base, and daily checklist. Rerolling chooses the starting account; normal gacha planning chooses how to spend the resources on the account you keep. Keeping those jobs separate prevents an endless reset loop.
Level everyone evenly
Cross the next main-team threshold before widening the roster.
Trust numbers without a date
Recheck region, version, and the current in-game detail screen.
Spend all base resources
Keep a reserve for the next growth or facility condition.
Leave daily tasks for later
Use a login and end-of-session check so limited rewards are not missed.
Record no failure reason
Name one cause before making the next upgrade.
When an official notice and a search result disagree, verify the official notice and the live game display instead of turning an assumption into a rule.
6. Next pages
Connect the beginner route to the right guide
Use the character guide for official identity, relationships, and roles. Use the reroll guide for a starting account and its link, the gacha guide for pull-or-save conditions, and the tier list for evaluation context rather than copying an S or A letter.
The reward, multiplier, event period, and unlock screen can change. Recheck the page date and official source after an update. This beginner guide is an entry route for updating decisions after the next loss or unlock, rather than a frozen list of launch numbers.
| Question | Next page | Use it for |
|---|---|---|
| Keep or reset the starting result? | Reroll guide | Linking, role, and keep line |
| Who is this character? | Character guide | Official profile and relationships |
| Pull or save? | Gacha guide | Banner conditions and resource line |
| How should a ranking be read? | Tier list | Role, fit, and growth cost |
FAQ
Suikoden STAR LEAP beginner guide questions
What should I do first in Suikoden STAR LEAP?
Finish the opening tutorial and story steps, confirm the summon, party, growth, and base screens, then choose one missing role for the main team. Do not level the whole roster at once.
Which character is best for the early game?
Compare the role your party lacks with the material cost and access you can support. A tier list is useful only when its content, conditions, and check date match your situation.
Who should get my early growth materials?
Give them to the main story team and reserve enough for the next threshold and base unlock. Change one cause at a time, then test the same stage again.
Should I restore the base or level characters first?
Check what is blocking progress and whether a production or facility unlock improves the next stage. Compare short-term rewards with the long-term resource loop instead of raising everything together.
Should I pull or save during the early game?
Check banner conditions, the missing team role, the build cost, and the resources reserved for the next base or story step. Use the live game screen for uncertain values.
What if an old guide disagrees with my game screen?
Check the region and version, then prioritize the live in-game display and the KONAMI official notice. Leave an unverified quantity marked as uncertain rather than guessing.
Official source and related pages
Use first-party information for distribution, notices, and platform facts. Use the current game screen for rewards, rates, event periods, and unlock conditions. The route in this page is an editorial decision framework, not an official fixed rule.
- KONAMI official Suikoden STAR LEAP siteFirst-party information, notices, and distribution links.
- Character guideOfficial profiles, relationships, and early role questions.
- Reroll guideKeep line, linking, and starting-account checks.
- Gacha guidePull-or-save decisions tied to conditions and build cost.
- Best characters and tier listRole, fit, and growth-cost evaluation conditions.
Summary
Fix one cause before spending the next resource
A strong Suikoden STAR LEAP beginner guide follows the story unlocks, fills one missing role, focuses growth materials, preserves base resources, and checks daily rewards. The numbers may change, but writing down the failure and next threshold keeps the decision process stable.